Your calendar is the heartbeat of your hosting journey! Once you set your park's first available date, your listing will pop up in search results immediately. Because your calendar starts completely open by default, taking a few moments now to customize your availability ensures that you only receive bookings that fit perfectly into your life.
Key Features to Master
The platform provides two primary ways to manage your time: setting a standard weekly schedule and applying specific overrides via the calendar.
1. Setting Your Baseline Availability
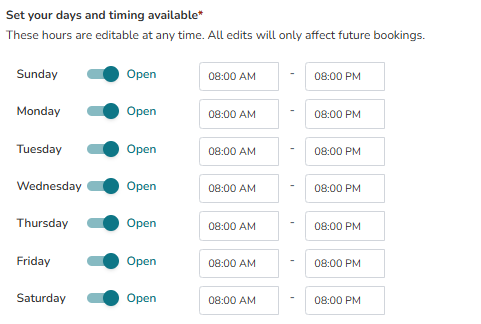
During listing setup (or anytime in your settings), you define your general operating hours. This acts as the "template" for every week.
- Global On/Off Switches: Use the toggles to mark entire days as "Open" or closed.
- Default Time Windows: Set your standard start and end times (e.g., 8:00 AM to 8:00 PM) for each day of the week.
2. Using Your "Add a Day" Blocks
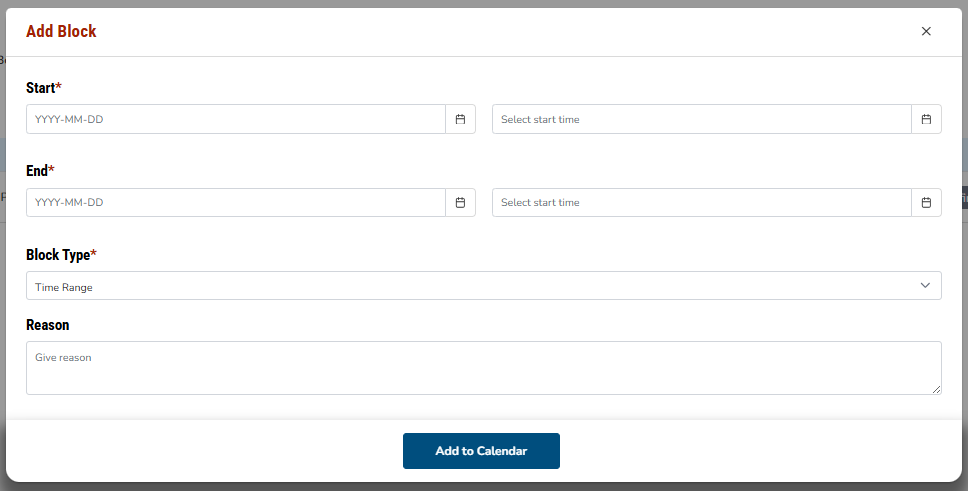
When you click Add a Day, you have the flexibility to customize how your time is blocked:
Blocking a Full Day: You can select an entire calendar day to hide your listing from all search results for that date. This is ideal for holidays or full-day maintenance.
Specific Time Blocks: Instead of the whole day, you can choose to block specific hours (e.g., 9:00 AM to 10:00 AM). This keeps the rest of your day open for potential bookings.
Single or Multi-Day Blocks: You can add a one-time block for a specific event or select multiple days at once if you'll be away for an extended period.
Repeating Blocks: If you have a recurring commitment, you can set a block to repeat regularly so you don’t have to update it manually every week.
3. Real-Time Booking Management
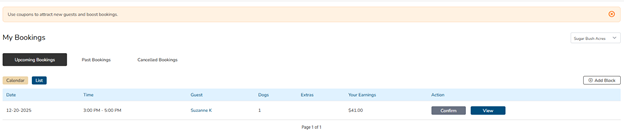
Once live, you can monitor your schedule through the My Bookings dashboard. This view allows you to see upcoming guests, the number of dogs attending, and your projected earnings at a glance.
Managing Your Blocks
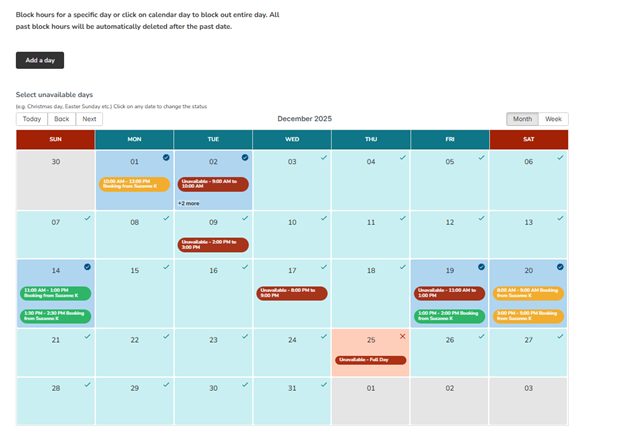
For life events, holidays, or personal errands, you can use the Calendar View to block out specific times when you are unavailable, even if those days are normally "Open."
- Full Day Blocks: Perfect for holidays or vacations. Simply click the date to toggle it to "Unavailable - Full Day" (e.g., December 25th).
- Time Range Blocks: If you have a doctor's appointment or a school pickup, you can block specific hours (e.g., "Unavailable - 9:00 AM to 10:00 AM") without closing the entire day.
- Custom Days: Use the "Add a day" button or click directly on the calendar to manage unique dates that fall outside your standard routine.
Managing Your Blocks
- Full day:
- Time Range
- Custom Days
Why It’s Important
Keeping your calendar updated is the best way to provide a great guest experience. It helps you avoid the stress of declining requests or—even worse—having to cancel a reservation, which can lead to fees and impact your hosting status. A well-managed calendar means you’re always ready for the right guest at the right time.
Pro Tip: Remember Your Buffers! While the system automatically adds a 30-minute buffer between back-to-back reservations, it does not automatically add buffers to your manual blocks. If you need a break before or after a personal block, be sure to include that extra time in your "Add Block" selection.
Was this article helpful?
That’s Great!
Thank you for your feedback
Sorry! We couldn't be helpful
Thank you for your feedback
Feedback sent
We appreciate your effort and will try to fix the article